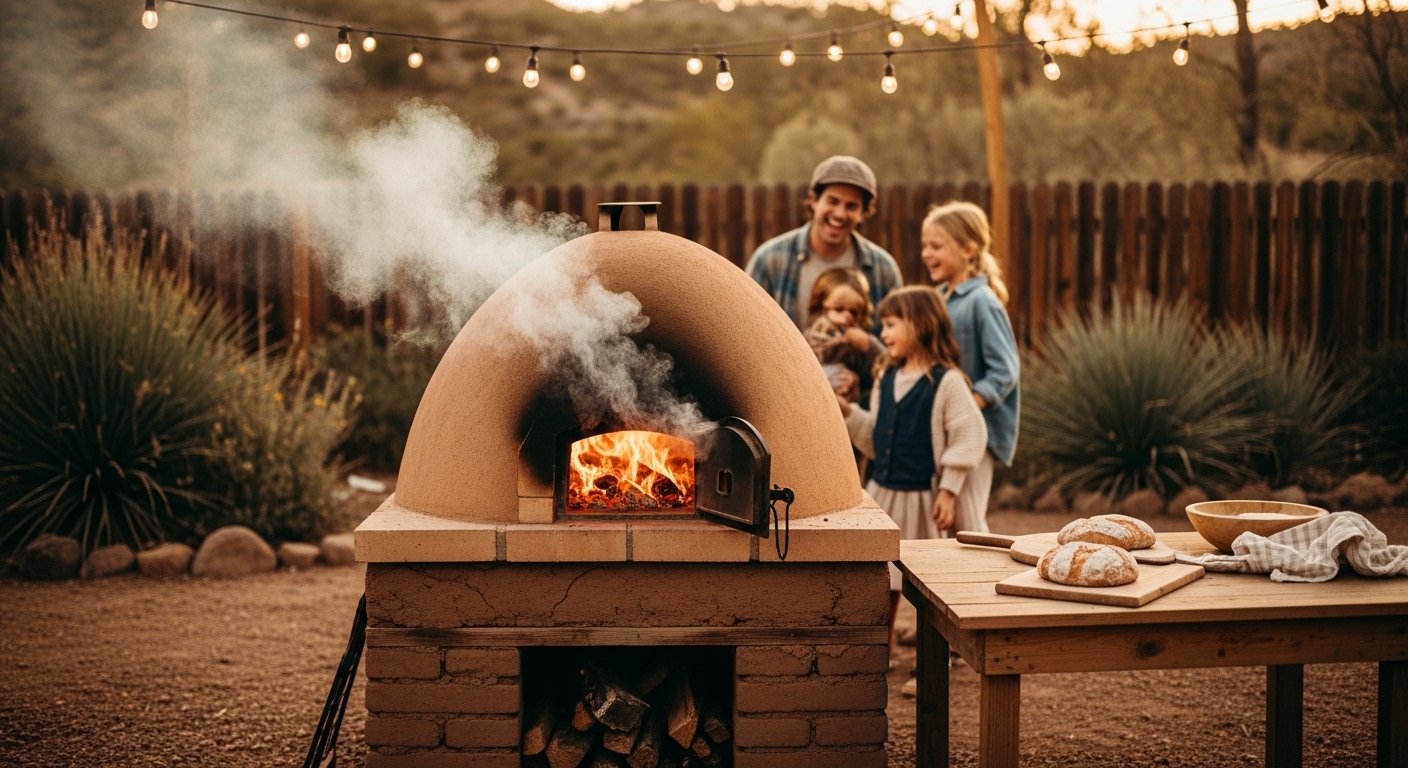
Picture this: the crackle of piñon wood, the earthy scent of warm adobe, and a golden loaf of bread sliding out of a dome-shaped oven you built yourself. That’s the hormita in action. This humble wood-fired masonry oven isn’t just a cooking tool. It’s a living piece of heritage that brings families together, saves energy through incredible heat retention, and turns any backyard into an outdoor kitchen worth bragging about.
Whether you’re a homeowner craving traditional DIY projects, an outdoor cooking enthusiast, or someone who loves sustainable ancient masonry techniques, the hormita fits right into modern life. It bridges centuries of vernacular architecture with today’s desire for real flavor and real connection. Let’s dive in and see why this earthen oven still matters so much.
The Rich History of the Hormita: From Ancient Roots to Today
The hormita traces its story back hundreds of years through cultural exchange. It began with Moorish builders in North Africa who perfected dome-shaped clay ovens for even heat. Spanish settlers carried the idea across the ocean, and soon these ovens dotted landscapes from Spain to the American Southwest. In places like New Mexico and Arizona, Native Pueblo communities embraced the hormita wholeheartedly. Families still fire them up for feasts, and young cooks learn the craft as a rite of passage.
Think of it as vernacular architecture at its finest. The hormita wasn’t designed in a fancy studio. It grew from the soil underfoot, using local clay, sand, and straw. Early builders shaped it like a beehive because the curve traps heat beautifully. Over time, it became more than a kitchen. It turned into a gathering spot where stories flowed as freely as the bread came out. Today, that same spirit lives on in backyards everywhere. People restore old hormitas or build new ones to honor their roots while enjoying fresh air and wood-fired meals.
How the Hormita Works: The Science of Thermal Mass Cooking
At its heart, the hormita is a genius at heat retention. You build a fire inside with dry wood. The thick adobe walls soak up every degree like a sponge. Once the coals die down, you sweep them out and slide in your food. The stored heat does the rest, baking evenly for hours without any electricity or gas.
This thermal mass cooking creates flavors you simply can’t match in a regular oven. Bread develops a crackly crust. Meats stay juicy inside while the outside caramelizes perfectly. Vegetables roast with an earthy sweetness. The best part? One fire can cook multiple batches because the hormita holds heat so well. It’s sustainable, efficient, and downright magical on a cool evening when the smell of woodsmoke drifts across the yard.
Why Build a Hormita Today? Benefits That Fit Modern Life
In a world of stainless-steel appliances, the hormita feels refreshingly real. It cuts energy use to almost nothing after the initial fire. It creates a natural centerpiece for outdoor kitchen design, perfect for weekend gatherings. And it connects you to cultural heritage in a hands-on way.
Here’s a quick comparison to help you see the appeal:
| Aspect | Hormita (Traditional) | Modern Gas or Electric Oven |
|---|---|---|
| Flavor | Rich, smoky, artisanal | Clean but one-dimensional |
| Energy Use | One wood fire lasts hours | Constant power draw |
| Cost Over Time | Low after build | Higher monthly bills |
| Community Feel | Draws people outdoors | Keeps everyone inside |
| Durability | Lasts decades with care | Needs repairs or replacement |
Many folks choose the hormita because it ticks every box for sustainable living. Plus, building one yourself gives that proud “I made this” feeling every time you open the door.
Step-by-Step: How to Build Your Own Hormita with Adobe Bricks
Ready to roll up your sleeves? Building a hormita is a rewarding traditional DIY project that anyone with a weekend and some patience can tackle. Here’s a clear, practical guide based on time-tested methods.
First, gather your materials:
- Local soil with good clay content (test by shaking dirt and water in a jar)
- Straw or dried grass for strength
- Sand for the mix if your soil needs it
- A few commercial bricks or stones for the base
- Simple wooden forms to shape adobe bricks
- Water, of course
Numbered steps for success:
- Choose a flat, well-drained spot away from your house. Build a sturdy base about 2 to 3 feet high using stones or bricks in mud mortar. This keeps everything dry and at a comfortable height.
- Mix your adobe. Combine soil, water, and chopped straw until it feels like thick cookie dough. Form bricks in wooden molds (roughly 4 inches wide by 7 inches long by 3.5 inches tall). Let them sun-dry for a week.
- Lay the first circle of bricks on the base, leaving a 9- to 12-inch door opening. Use the same mud as mortar. Stagger the next layers like bricks in a wall, gently sloping inward to form the beehive dome.
- Build in stages. Let each layer dry a day or two so it supports the next. Near the top, leave a small smoke hole on the back side.
- Smooth the inside with more mud plaster. When everything is bone-dry, light a small test fire to cure it fully.
- Finish the outside with a thin layer of lime plaster or whitewash for weather protection. Add a simple wooden door that fits loosely for airflow.
Total time? About two weekends if the weather cooperates. The result is a rock-solid hormita ready for years of use. Many builders report their first loaf tastes better than anything from a store.
DIY Hormita Kit vs Custom Build: Which Is Right for You?
Some folks start with a DIY hormita kit that includes pre-mixed adobe or forms. These save time and cost around $200 to $400. Others go fully custom with local dirt and save even more. Custom builds feel more authentic and let you tweak the size for your small backyard hormita designs. Either way, you end up with the same wonderful heat retention.
Hormita Oven Maintenance Tips and How to Season a New One
A new hormita needs gentle care at first. Season it by lighting small fires over several days, gradually increasing the heat. This drives out any remaining moisture and hardens the clay.
For ongoing care:
- Cover the top during heavy rain with a tarp.
- Inspect for hairline cracks each spring and patch with fresh mud.
- Re-whitewash the outside every year or two to seal it.
- Always sweep ashes completely before baking to avoid off flavors.
With these simple hormita oven maintenance tips, your oven will last decades and improve with age, just like fine wine.
Traditional Hormita Bread Recipes to Get You Started
Nothing beats the first loaf. Try this classic approach:
Mix 4 cups flour, 1 packet yeast, 1.5 cups warm water, and a pinch of salt into a soft dough. Let it rise. Shape into rounds. Heat your hormita with a good fire for about an hour, then remove the coals. Slide the dough in on a peel, seal the door with a damp cloth, and bake 20 to 30 minutes. The crust will sing when you tap it. For extra flavor, add rosemary or roasted garlic. Families often make enough to share with neighbors, keeping the community spirit alive.
Insulation Techniques and Small Backyard Hormita Designs
For cooler climates, add an extra layer of straw-clay insulation under the final plaster. It boosts heat retention even more. In tight spaces, keep the hormita compact at 30 to 36 inches wide. Place it near a patio for easy access during parties. Some creative builders even tuck benches around it so guests can chat while the bread bakes. These touches turn a simple oven into the heart of your outdoor living area.
5 Quick Takeaways to Remember
- The hormita connects you to centuries of tradition through simple adobe brick construction.
- Its thermal mass cooking delivers unbeatable flavor with almost no ongoing energy cost.
- Building one is a fun, approachable DIY project that fits small backyards perfectly.
- Proper seasoning and yearly maintenance keep it performing like new for decades.
- Best of all, it brings people together around real food and real stories.
There you have it. The hormita isn’t just an oven. It’s a warm invitation to slow down, gather friends, and create memories the old-fashioned way. Why not start planning yours this weekend? Grab some clay-rich dirt, invite a few neighbors, and watch how quickly this ancient beauty becomes the favorite spot in your yard. I’d love to hear how your first bake turns out. Drop a comment below or share a photo of your hormita project. Happy baking!
FAQs
What exactly is a hormita?
It’s a traditional dome-shaped earthen oven made from adobe bricks and clay. People use it for wood-fired baking and roasting, prized for its excellent heat retention.
How much does it cost to build a hormita?
A basic DIY version runs $150 to $500 depending on whether you use free local soil or buy a kit. Custom stone versions can reach $800 but last a lifetime.
Is the hormita safe for backyard use?
Absolutely, when built on a stable base away from structures and used with common sense. Keep a fire extinguisher nearby and never leave it unattended while firing.
How long does a hormita take to build?
Most people finish in two weekends, working a few hours each day. The drying time between layers is the biggest wait.
Can I use a hormita for more than bread?
Yes! Roast meats, vegetables, pizzas, or even steam corn. The versatile heat works wonderfully for all kinds of artisanal baking.
Do I need special skills to maintain a hormita?
Not at all. Simple annual plaster touch-ups and crack repairs keep it in top shape. Many owners say it gets better with age.
Where can I learn more about hormita history in local culture?
Visit living history sites in the Southwest or chat with elders in communities that still fire up traditional ovens. Books on adobe building also share wonderful stories.